This article explains that how to manage User Accounts using utility “Netplwiz”. Netplwiz facilitates Administrator to add, remove users and groups and gives wonderful alternate to local users and groups MMC tool. Here people will get to know that how it manages Windows 8 / Windows 8.1 User Accounts and what are the functionalities and features of Advance User Accounts Control Panel(Netplwiz).
Functionalities of Advance User Accounts Control Panel(Netplwiz)
1. Create/Add User Account
There are many ways in Windows 8 / Windows 8.1 operating system to create user account among them Advance User Accounts Control Panel(Netplwiz) utility is also there . To create an account the user to be an Administrator or part of Administrator group.
First Step:
Open Advance User Accounts Control Panel using key Windows + R from the keyboard or click on Start –> Run program and type “Netplwiz” and click “OK”.
Second Step:
After opening the User Accounts wizard, click on the “Add” button to create a new user account. As soon as user click on Add button gets “Add a User” Wizard. In the “Add a User” Wizard as an Administrator, fill all columns and click on “Next”.
For example: Give the User name: SomyaSystem, Password, Reenter password, and Password hint: Somya Password and click on “Next”.
Third Step:
After clicking on “Next” button, one more wizard opens that will be the confirmation wizard from Administrator. This wizard also facilitates the Administrator to decide that the User Account is created for Child \ Kids or not, if the account is created for Child \Kids, Windows 8 / Windows 8.1 offers an option to turn on Family Safety for that account, as shown below.
Fourth Step:
Click “Finish” to create a User Account.
2. Remove User Account
Using “Netplwiz”, user cannot only create a User Account, they can remove the account too, only user should have Administrator privileges to do that.
First Step:
Follow same steps to open User Accounts Control Panel using key Windows + R from the keyboard or click on Start –> Run program and type “Netplwiz”.
Second Step:
After opening User Accounts wizard, select the account user wants to remove from Windows 8 and click on Remove button. For example; let’s remove the above created account SomyaSystem. To remove this account, first select the “SomyaSystem” account, and then click on Remove button, it will show the message given below in the picture to remove the selected account. Read the message and choose “Yes” or “No”. Click on “Yes” option to remove the user from Windows 8 workstation.
3. Properties Option
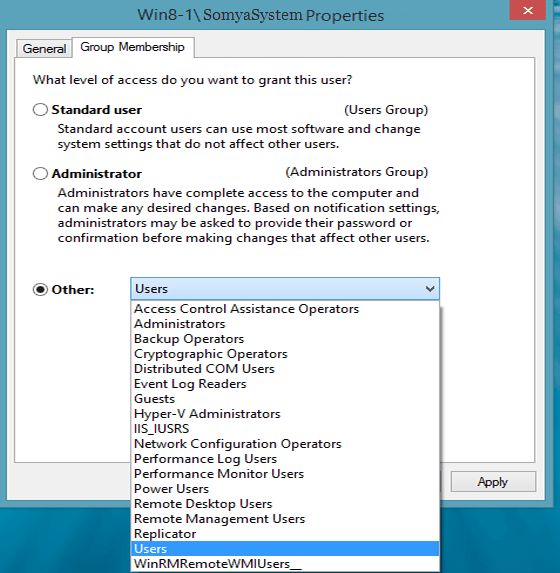
Properties option facilitates Administrator to change the User accounts General Information and manage Local Group using Group Member option. Using Group Member option Administrators can change the User Account type – Standard User, Administrator, or Other.
Follow steps given below to manage the User Group Membership, only user should have Administrative rights to do that.
First Step:
Open Advance User Accounts Control Panel. From the User Accounts wizard, choose a User account and click on Properties button. For example; choose the above created account “SomyaSystem” and click on Properties option.
Second Step:
In Properties option – General tab, Administrator can change the User Name, Full Name and Description of a specific User Account.
In Properties option – Group Membership tab, Administrator gets three options to change the User account – Standard, Administrator or Other as shown in the picture below.

Third Step:
After choosing preferred Group for which User account will be part of, click Apply and OK to complete the process.
4. Reset Password
User who has Administrative rights or the part of Administrator group having rights to reset the password of the Local User accounts as explained in the below steps.
First Step:
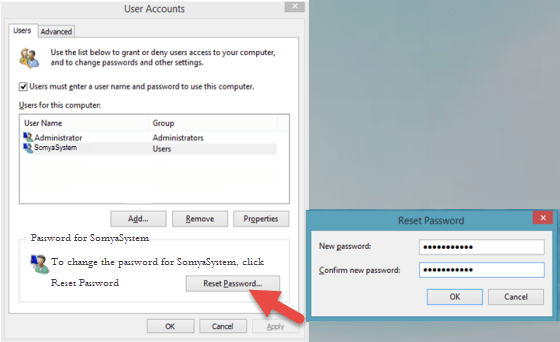
Open Advance User Accounts Control Panel, after opening User Accounts wizard, select the User Account and click on “Reset Password” to change the password.
Second Step:
On the Reset Password wizard, enter the password and click on “OK”.


