UPDATE – Spam Control Experiment

Posted on

A few weeks ago I explained my experiment on how I can control my spam doing nothing else but unsubscribing from emails I receive and don’t want.

Its been about 12 weeks since I began this experiment. My initial results in the first 3 weeks were amazing. I reduced my spam emails by 50%. It’s a little work to unsubscribe from some lists. If you remember, sometimes you need to unsubscribe several times, add REMOVE to your email subject, find the unsubscribe button in the email and sometimes a combination of all the above.

Now its Christmas – what better time to stop the spam emails to lists you never signed up for. and to verify our experiment. Since early October, I have intensified my unsubscribing and not allowed ANY emails I do not need to not be unsubscribed. Naturally, as I ordered items, visited web sites and performed my daily work tasks, my email will always be on another list – so i was very diligent in my immediate unsubscribing.

Results as of December 6, 2017

COMPLETE SUCCESS! – my mailbox has been reduced by 80% of junk mail. Where at nite, I would receive a few dozen emails, now I can go hours without a single unwanted email. Some experimentation with our intrusion detection software shows that attacks have been lessened, email’s with viruses loads have been reduced and our firewalls have seen a reduction in threat assessments. Therefore we can posit that the reduction in spam emails can make out network and business somewhat safer.

Therefore – unsubscribe from unwanted emails – except from us!

TLDR – Too Long, Didn’t Read

Unsubscribe from unwanted emails as you receive them – it will protect your network and decrease your incidences of viruses as well as clean you inbox!

 

Merry Christmas to all!

How to resend an Outlook email – Outlooks Hidden Feature

Posted on

Do you need to send an email again? Maybe you forgot to attach a file the first time, or maybe you sent it to the wrong person, maybe you need to add a few more recipients…

One way to do this is to go to find the sent email (in your Sent Items folder) and then do a Forward or Reply on it, make any changes you want and then click Send. The problem with that is it adds FW or RE in the subject line… and adds the original send dates, recipients etc in the body of the email. Any changes that you make to the email may also be highlighted in a different color making it look like you resent the email.

If email security and confidentiality is important to your organization, you may also want to look at SendGuard for Outlook.

There is an another way built into Outlook.

Go to your Sent Items folder.

Open the email in its own window (by double-clicking on it).

The Message tab of the Ribbon should already be selected (click on it if you need to).

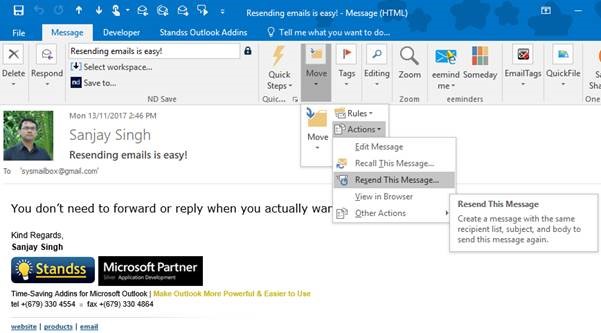
One the Move group, click Actions and then click Resend This Message.
SendGuard for Outlook
A new unsent email will be opened will all the details of this email copied to it. Make any changes that you need to and then click Send.


Resetting Microsoft Edge Browser

Posted on

Resetting Microsoft Edge Browser

Sometimes Microsoft’s Edge browser simple does not work properly. Web sites fail to load, web apps do not work properly and in general Edge3 causes more trouble than its worth. That’s when Firefox & Google Chrome can be saviors.

If you are experiencing any or other issues with Edge, than you can try this fix.

WARNING – resetting a browser may result in data loss, including the loss of favorites, settings, browser history, installed extensions, or other things maintained in the browser

To Reset Microsoft Edge:

  1. Turn “off” Device Sync Settings (Settings > Accounts > Sync your Settings > Sync Settings).
  2. Open File Explorer
  3. Find the following: C:\Users\%username%\AppData\Local\Packages
  4. Select and delete the following folder:
    Microsoft.MicrosoftEdge_8wekyb3d8bbwe(Select “Yes” on any confirmation dialog that follows.)
  5. In %localappdata%\Microsoft\Windows\SettingSync\metastore, delete
    meta.edb, if it exists.
  6. In %localappdata%\Microsoft\Windows\SettingSync\remotemetastore\v1, delete
    meta.edb, if it exists.
  7. Restart your PC (Start > Power > Restart).
  8. Turn “on” Device Sync Settings (Settings > Accounts > Sync your Settings > Sync Settings).
  9. Search for “PowerShell” using Cortana.
  10. Right-click the “Windows PowerShell” result, then select
  11. Run as administrator.
  12. Copy the following command, then Paste it in the PowerShell window and press Enter to run it:

Get-AppXPackage -AllUsers -Name Microsoft.MicrosoftEdge | Foreach {Add-AppxPackage -DisableDevelopmentMode -Register “$($_.InstallLocation)\AppXManifest.xml” -Verbose}

13. Then the command completes, Restart your PC (Start > Power > Restart).

Create web page shortcut for Edge

Posted on

To create a desktop shortcut in Microsoft Edge to open a website or a web page direct in Edge browser, you will have to follow the usual way to create a desktop shortcut and change its icon.

If you have set Edge as you default browser:

  • Right-click on the desktop
  • New
  • Shortcut
  • In the Type the location of the item field, type the URL of the web page
  • Click on Next, give the shortcut and name and complete the process. You may want to change the icon of the newly created shortcut.
  • Now when you click on it, the web page will open in Edge.

Turn off Low Toner Notifications in Windows 10

Posted on

How to turn off “Low Toner Notifications” in windows 10

Go to Devices and Printers
Click on Print Server Properties (in the “toolbar” area above the list of devices).
Click on the Advanced Tab.
For a local printer: Uncheck “Show Informational notifications for local printers”.
For a network printer: Uncheck “Show Informational notifications for network printers”.
Click OK.