Resolving HDMI Sound Issues

Posted on

Resolving HDMI Sound Issues

  • Right-click the Volume icon by the time in the lower-right corner.
  • Click Playback Devices.
    The Sound window opens.
  • On the Playback tab, click the following audio output device that is listed:
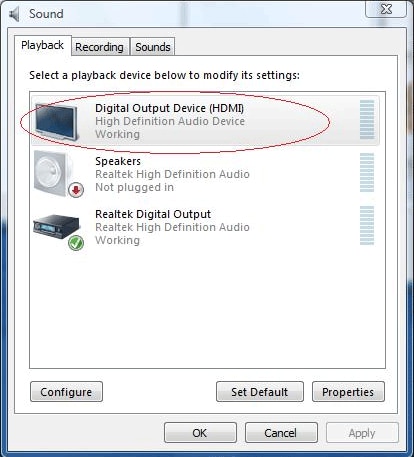
    • Digital Output Device (HDMI)
      Figure : Digital Output Device (HDMI) selection

      Image of Digital Output Device (HDMI) selection

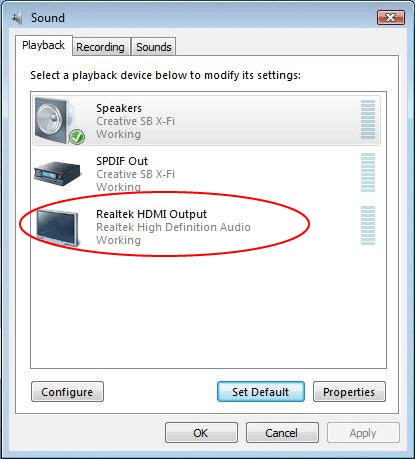
    • Realtek HDMI Output
      Figure : Realtek HDMI Output selection

      Realtek HDMI Output selection

    • NVIDIA HDMI Output
      Figure : NVIDIA HDMI Output selection

      NVIDIA HDMI Output selection

    • ATI HDMI Output
      Figure : ATI HDMI Output selection

      ATI HDMI Output selection

  • Click Set Default.
  • Click Apply.
    • If you used Digital Output Device (HDMI), click OK to close the window. This completes the steps to activate HDMI sound.
    • If you used Realtek HDMI Output, continue with Step 6.
  • Double-click Realtek HDMI Output.
    The Realtek Digital Output Properties window opens.
  • Click the Supported Formats tab.
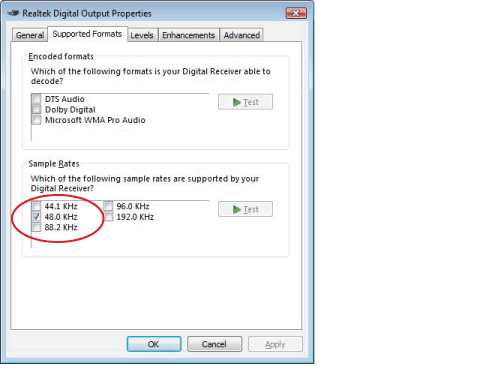
  • Place a check in the 48.0 KHz check box, and make sure that there are no checks in the Dolby Digital check box and all other check boxes.
    Figure : Supported Formats settings in the Realtek Digital Output Properties window

    Supported Formats settings in the Realtek Digital Output Properties window

      note:
    For most TVs to play back audio, the sample rate must be 48.0 KHz.


Nortel/Norstar Auto Attendant and Voice Mail Phone System Programming

Posted on

Nortel/Norstar Auto Attendant and Voice Mail Phone System Programming

Programming must be done from any M7310, T7316, or M7324 model phone set.

On phone Handset Press Feature 983

Id 1020000

Press AA

Press GRTG

Press GRTG

Create or Select Greeting:

1 – Message 1

2 – Message 2

3 – Message 3

4 – Message 4

etc…

Record messages using handset

Press OK

Play or record new message

Press OK

Additional Programming

Programming must be done from any M7310, T7316, or M7324 model phone set.

 To Log Into System Administration:

1. Enter Feature 983
2. The display will show “LOG”, enter your login password

a. If your company extensions are 2 digits long enter “120000”
b. If your company extensions are 3 digits long enter “1020000”
c. If your company extensions are 4 digits long enter “10020000”

  1. Press the softkey under “OK”

    To Create a New Mailbox:

  2. Log into system administration
  3. Select the softkey under “MBOX”
  4. Select the softkey under “ADD”
  5. Enter the mailbox number (extension. you want to add
  6. Mailbox type: Subscriber and then select “OK”
  7. Extension: Usually the same as the mailbox number
  8. Service Class: Enter 1
  9. Name: Enter the name using the dial pad. Enter last name first, press “# #” to enter a comma, and then enter the first name. When spelling the name, press # to move to the next character
  10. Directory: Y (Yes.
  11. Message Waiting: Y (Yes.
  12. Out dial: Pool, enter 1 and then OK
  13. Accept: 1, select OK

    To Delete a Mailbox:

  14. Log into the system administration
  15. Select the softkey under “MBOX”
  16. Select the softkey under “DEL”
  17. Enter the mailbox number (extension. you want to delete
  18. Select the softkey under “Delete”

    To Reset a Mailbox Password:

  19. Log into system administration
  20. Select the softkey under “MBOX”
  21. Select the softkey under “Chng”
  22. Enter the mailbox number you want to reset the password for
  23. The display shows “Reset Password”
  24. Select the softkey under “RESET”
  25. Press the release key
    *The new password will be “0000”, the system will ask the user to change this the first time they log into their mailbox using this password.

    To Change the Name on a Mailbox:

  26. Log into system administration
  27. Select the softkey under “MBOX”
  28. Select the softkey under “Chng”
  29. Enter the mailbox number (extension. you want to change the name on
  30. The display shows “Reset Password”
  31. Select the softkey under “Next”, keep hitting “Next” until the display shows the name
  32. Select the softkey under “Chng” to enter a new name
  33. Enter the name using the dial pad. Enter last name first, press “# #” to enter a comma and then enter the first name. When spelling the name, press “#” to move to the next character
  34. Select the softkey under “Next” to save the change
  35. Hit the release button

    To Change the “Recorded” Name for the Company Directory:

  36. Have the Voicemail User log into their mailbox, after putting in their password, press the button under “Admin” (or press the number 8 key., and then press the number 1 key.
  37. You will hear the old recorded name and then the system will “beep”, prompting you to record a new name (name only here, not greeting..
  38. Press “Ok” in the window when you are done recording and then “Ok” again to accept the recording
Nortel Phone System – Changing Mailbox Password

Posted on

Main mailbox#: either 10 or 100

This video covers how to reset your mailbox password or any mailbox’s password as an administrator on your Nortel phone: http://www.digitcom.ca/training_video_tutorials/How-to-reset-your-mailbox-password.html

  • Go to one of the bigger phones in your office, for example “Nortel T7316E”, or “Nortel T7324”
    Press “Feature” -> Enter 983, the screen should show “LOG”, then enter your password then press OK. In our case, The password is 1020000. This is the default password for this type of system.
  • Press “MBOX” -> press “CHANGE”, then enter the mailbox number that you want to reset. In our case, the mailbox number is 223. Press the “Reset” option button once.
  • The system will flash briefly. Press the “release” button or hang up the phone to finish editing. You can now go to your mailbox. If there is a mailbox button on your phone, press it. If not, press the “Feature” button-> enter 981.
  • The system will ask: “PLEASE ENTER YOUR MAILBOX NUMBER AND YOUR PASSWORD THEN PRESS NUMBER SIGN ”. Enter your mailbox number and the default password which is “0000”, then press “#”.
  • The system will ask you to enter the new password. Enter the new password now then press “#”. Accept the change by pressing the “Yes” option button.
  • The system will then ask you to record a name to initialize the mailbox. Pick up your handset and record the name you would like to associate with the mailbox.

Download the Norstar-Nortel VoiceMail Setup Guide